Few things are as disheartening as finding a gorgeous mid-century sideboard or an antique walnut vanity, only to notice the edges curling upward like dried parchment. Veneer damage often looks catastrophic at first glance, leading many people to either paint over the piece or abandon it entirely.
That reaction is understandable, but it is usually unnecessary. Veneer is not a cheap imitation material; historically, it was an artisan technique used to showcase the most dramatic, figured cuts of rare hardwoods over stable secondary wood. The good news is that lifting, bubbling, or peeling veneer is one of the most straightforward woodworking issues to repair once you understand why it failed in the first place. With a handful of basic workshop supplies and a patient hand, you can secure the surface and restore the piece to its original glory.
Assessing the Damage and Substrate
Before reaching for an adhesive bottle, you need to understand what you are working with. Veneer lifts because the bond between the decorative top layer and the underlying base has broken down. On pieces built before the mid-twentieth century, that bond was almost certainly hot animal hide glue, which deteriorates when exposed to prolonged moisture, damp basements, or extreme dry heat. On later pieces, synthetic adhesives were common, which tend to fail due to mechanical stress or wood movement.
Start by running your fingertips lightly across the entire surface. Listen and feel for hollow pockets, known as blisters, where the veneer has separated from the core without cracking. Next, inspect the edges and corners. Are the loose sections still pliable, or have they become brittle and curled?
Take a close look underneath the lifted section. Over decades, fine dust, wax, and crumbling glue residue accumulate in that gap. If you simply pump fresh glue into that void and clamp it down, the debris will prevent the wood from sitting flat, creating an unsightly lump. Use a stiff artist brush, canned air, or a thin dental pick to gently clear out the cavity. If the veneer has warped upward and resists being pushed flat with light finger pressure, do not force it dry, or it will snap along the grain.
Gathering the Right Tools and Adhesives
Repairing veneer requires precision rather than heavy machinery. Having the correct supplies laid out beforehand makes the difference between an invisible repair and an uneven mess.
-
Liquid hide glue or high-tack PVA wood glue: Liquid hide glue is the gold standard for antique furniture. It has a long open working time, cleans up easily with warm water, and bonds exceptionally well to remnants of old animal glue. Modern PVA wood glue works fine on mid-century pieces, provided the old glue has been thoroughly scraped away.
-
Glue applicators: A plastic glue syringe, a palette knife, or a piece of thin plastic cut from a blister package allows you to work adhesive into tight crevices without lifting the wood too high.
-
Clamping cauls: Small, flat scraps of hardwood or medium-density fiberboard (MDF) to distribute clamping pressure evenly across the repair.
-
Wax paper or parchment paper: Essential for placing between your caul and the veneer to ensure squeezed-out glue does not permanently attach your clamping block to the furniture.
-
Clamps and weights: C-clamps, quick-action bar clamps, or heavy, flat weights (like cast-iron pans or cloth bags filled with lead shot) for areas where clamps cannot reach.
Re-adhering Lifted Edges and Corners
Edge failures are the most common veneer issues because corners naturally take the brunt of bumps, moves, and humidity changes.
Soften Brittle Wood if Necessary
If the curled veneer feels stiff and threatens to snap when pressed down, it must be hydrated before gluing. Place a damp (not soaking) cotton cloth over the lifted section for five to ten minutes. Alternatively, apply a light mist of water or a specialized veneer softener. Once the wood absorbs a small amount of moisture, it becomes pliable enough to bend back down against the substrate without fracturing.
Apply the Adhesive Evenly
Gently prop the lifted edge open just wide enough to insert your applicator. Spread a thin, consistent layer of glue onto both the underside of the veneer and the exposed substrate. Avoid dumping a heavy puddle into the gap; excess glue creates hydrostatic pressure that prevents the veneer from bedding down flat and leads to messy squeeze-out. Use your thin spatula or syringe to work the adhesive as far back into the root of the separation as possible.
Bed Down the Veneer and Clamp
Press the veneer down firmly with your fingers, working from the sound wood outward toward the edge to push out trapped air. Wipe away any immediate glue squeeze-out with a damp rag.
Place a sheet of wax paper directly over the repair. Set a smooth wooden caul on top of the wax paper, and secure it with clamps. Tighten the clamps with firm, moderate pressure. Cranking a clamp down with maximum force is a mistake; it can crush old wood fibers or squeeze out all the adhesive, starving the joint. Leave the assembly clamped for at least twelve to twenty-four hours to let the glue cure completely.
Flattening Veneer Blisters and Bubbles
Blisters occur in the field of a tabletop or panel where moisture caused a section of veneer to detach and swell outward, creating a small dome. There are two effective ways to tackle this.
The Reactivation Method for Antique Pieces
If your piece dates to the early 1900s or earlier, the original adhesive is likely animal hide glue, which is thermoplastic and moisture-reversible. You can often fix blisters without adding new glue.
Place a damp cotton tea towel over the bubble. Set a household iron to medium heat (no steam setting) and press it firmly over the towel for ten to fifteen seconds. The combination of heat and moisture softens the original glue underneath and relaxes the wood fibers. Remove the iron and towel immediately, press the bubble flat with a wooden block, and clamp it with a caul or weight until the area cools and dries completely.
The Surgical Slit Method
If the iron method fails or the piece was built with modern synthetic glue, you need to introduce fresh adhesive into the pocket.
Take a brand-new razor blade or craft scalpel and make a tiny, clean incision directly along the grain through the highest point of the bubble. Slitting with the grain ensures the cut disappears once closed. Press down on the bubble to expel trapped air.
Using a glue syringe fitted with a blunt needle, insert a small amount of liquid hide glue through the slit. Massage the blister with your thumb in circular motions to distribute the glue evenly beneath the entire detached area. Wipe away any surface residue, cover with wax paper, place a caul over the blister, and clamp it down securely.
Patching Areas of Missing Veneer
If a piece of veneer broke off and went missing years ago, filling the crater with standard wood putty will look muddy and amateurish. The proper approach is a grain-matched Dutchman patch.
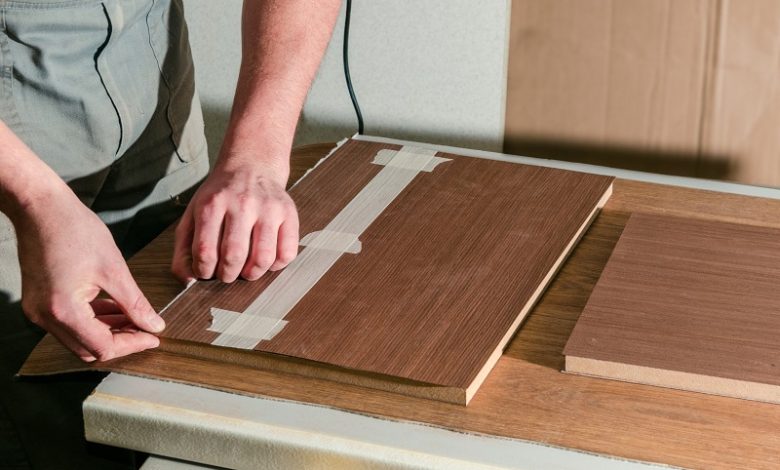
Find a donor piece of veneer that matches the species, age, and grain direction of the damaged area. You can salvage donor veneer from an inconspicuous spot on the same piece of furniture—such as the bottom edge of a back panel—or buy small sample packs of raw wood veneer online.
Instead of cutting a square or rectangular patch, cut an irregular diamond or boat shape with tapered points. Square edges cut across the wood grain and create stark shadow lines that the human eye immediately notices, whereas tapered cuts parallel to the grain blend into the natural lines of the wood.
Hold your donor patch over the damaged area and trace around it with a sharp marking knife. Carefully chisel away the remaining old veneer inside that traced line so the recess matches the exact footprint of your patch. Test the fit dry; the patch should sit flush or microscopically proud of the surrounding surface. Glue and clamp the patch into place. Once cured, carefully scrape or sand it flush using 320-grit sandpaper wrapped around a hard block.
Blending the Repair and Protecting the Finish
Once your veneer is mechanically sound and flat, the final step is aesthetic integration. Even a well-executed repair might show a faint hairline seam where the joint met.
To blend seams or raw patch edges, use artist oil paints, specialized furniture touch-up markers, or pigmented wax fill sticks matched to the background color of the wood. Work color into the seam line and immediately wipe off the excess with your thumb so the pigment stays only in the micro-crevice.
When sanding around vintage veneer repairs, exercise extreme caution. Factory veneers on antique and vintage furniture are thin, often measuring only 1/28th of an inch thick, and on mid-century modern pieces, they can be even thinner. Power sanders should never touch vintage veneer; a single aggressive pass with an orbital sander can permanently burn through the face grain into the secondary wood beneath. Always sand by hand, with the grain, using fine grits (240 to 400).
Seal your hard work with a finish appropriate to the era of the furniture. For antiques, a few thin coats of dewaxed shellac or a quality paste wax buffed with a soft cloth will protect the wood while maintaining an authentic, soft patina.
Keeping Veneer Stable for the Long Term
Wood constantly moves in response to environmental moisture, expanding in humid conditions and contracting in dry air. Veneer is particularly vulnerable because the thin face veneer and the thick substrate underneath react to humidity at different rates.
To prevent future peeling, avoid placing restored vintage furniture in the direct blast of heating vents, radiators, or air conditioners. Keep pieces out of continuous direct sunlight, which bakes out residual moisture and degrades adhesives over time. Aim for a relatively stable indoor humidity level between 40 and 50 percent, and clean surfaces with a lightly dampened cloth followed immediately by a dry towel, steering clear of silicone-heavy cleaning sprays that can seep under edges and dissolve adhesive bonds.
Taking the time to repair damaged veneer preserves the character, history, and financial value of vintage furniture, keeping remarkable craftsmanship in active use for decades to come.