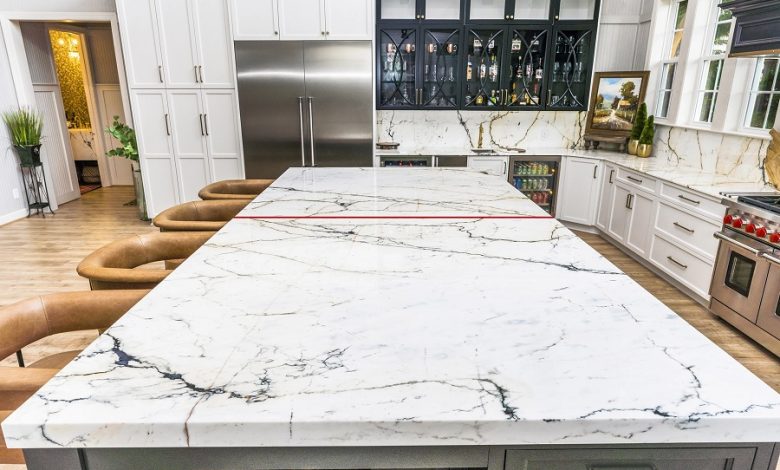
Even in an impeccably maintained kitchen, a dark, jagged line cutting across an expanse of laminate draws the eye immediately. Countertop seams are unavoidable in large or angled kitchen layouts, where standard eight- to twelve-foot sheets must meet to form an L-shape or span an oversized island. When freshly installed by a seasoned fabricator, these joints can be remarkably subtle. Over time, however, seasonal humidity changes, settling cabinetry, grease accumulation, and everyday wear loosen the joint, leaving behind a noticeable gap that collects dirt and distracts from your kitchen aesthetic.
Camouflaging a laminate seam does not require tearing out your counters or hiring an expensive contractor. With the right mechanical adjustments, dedicated solvent-based fillers, and an eye for color matching, you can blend the dividing line into the surrounding pattern and create a virtually seamless look.
Inspecting the Joint and Assessing Substrate Health
Before reaching for any filler, you must diagnose why the seam became prominent. A laminate countertop consists of a thin, rigid decorative resin sheet bonded to a thick core of medium-density fiberboard (MDF) or particleboard. If the seam is merely an aesthetic gap caused by shrinkage or minor shifting, it is straightforward to conceal. If moisture has infiltrated the joint and swollen the underlying wood core, cosmetic repairs alone will not hold.
Run your index finger across the seam from left to right. If both sides sit on the exact same plane and feel smooth, you are dealing with a simple gap that needs filling and color blending. If one side sits noticeably higher than the other—a defect known in the trade as lippage—or if the edges feel spongy and raised, water has likely penetrated the seam.
Light swelling can sometimes be compressed back into place, but severe rot or crumbling core material requires reinforcing the joint before you begin cosmetic work. Furthermore, check the underside of the counter inside your base cabinets. You should see recessed pockets housing metal miter bolts, often called dog-bone or tite-joint fasteners. These bolts clamp the two countertop halves together and serve as your first line of defense in closing mechanical gaps.
Cleaning and Prepping the Seam Channel
A filler cannot properly bond to greasy film, hardened wax, or old cooking oils. Cleaning the seam thoroughly is the difference between a repair that lasts a decade and one that peels away in three weeks.
Avoid household cleaners that leave behind surfactants or moisturizers. Instead, soak a lint-free cotton cloth in denatured alcohol or pure acetone, then scrub along the entire length of the joint. Take a wooden toothpick or a plastic craft pick and gently rake through the crevice to clear out accumulated grime, pet hair, and dried silicone from previous quick-fix attempts. Never use metal utility knife blades or screwdrivers for this step, as dragging steel through the gap can easily chip the brittle melamine edges of the laminate, turning a hairline crack into a series of jagged micro-chips.
Once the debris is gone, wipe the surface dry with a microfiber cloth and let the joint breathe for at least thirty minutes to ensure all residual solvent evaporates completely from the porous core underneath.
Mechanically Tightening and Leveling the Joint
Closing the physical gap as much as possible reduces the amount of filler needed, which yields a far more durable and invisible repair.
Tightening Undersink Miter Bolts
Climb beneath the countertop with a flashlight and a small open-end wrench. Locate the miter bolts connecting the two slabs. Over years of heavy leaning, drawer slamming, and temperature swings, the nuts on these fasteners routinely loosen. Slowly tighten each nut, alternating between bolts to apply even tension along the miter. In many cases, tightening these fasteners closes a wide hairline gap down to a fraction of a millimeter without any top-surface work required.
Resolving Lippage and Uneven Edges
If one side of the seam sits slightly higher than the other, check whether the countertop is adequately supported by the cabinet frame below. You can often drive a wooden shim between the cabinet rail and the underside of the lower slab to bring it level with the neighboring surface.
If a section of laminate has lifted away from the particleboard substrate due to failed contact adhesive, use a thin plastic palette knife to work a small drop of standard wood glue or two-part epoxy underneath the lip. Place a smooth wooden caul covered with wax paper over the joint, and clamp it firmly against the countertop until the adhesive cures.
Filling the Gap with Specialized Laminate Resins
Hardware store caulk and multi-purpose wood putties are the most common mistakes homeowners make when attempting this repair. Silicone and latex caulks attract grime, remain rubbery, and shrink into a noticeable trough, while wood putties dry to a flat, opaque chalk that looks completely out of place against polished resin.
The industry standard for seamless repairs is a solvent-based laminate repair resin, such as SeamFil. This material is made from the exact same synthetic resin used to produce the original laminate sheet. Once cured, it chemically bonds to the edges of the laminate, resists moisture, and hardens to the exact same density and texture as the countertop itself.
Selecting and Mixing the Color
Laminate patterns rarely consist of a single uniform tone. Most feature complex layers of flecks, stone veining, or woodgrain striations. Buy a repair kit that includes primary shades alongside your countertop’s dominant base color so you can custom mix on a disposable piece of scrap plastic or ceramic tile.
-
For solid-color counters, mix the resin until it matches the background hue under your kitchen’s actual ambient lighting.
-
For granite or quartz-look laminates, match the predominant mid-tone color first, as darker tones tend to dry slightly darker than they appear wet.
-
Add a single drop of dedicated retarder or solvent to keep the mixture pliable while you work.
Application and Flush-Leveling
Apply blue painter’s tape along both sides of the seam, leaving less than a sixteenth of an inch of exposed laminate on either side. This keeps cleanup confined to the joint itself.
Using a flexible plastic putty knife or an artist’s palette knife, press the mixed resin firmly into the gap at a forty-five-degree angle. Work across the seam rather than parallel to it; scraping parallel tends to pull the paste back out of the groove. Pack the material until it mounds slightly above the surface to account for microscopic solvent evaporation.
Allow the resin to set according to the product guidelines, usually three to five minutes until it loses its high-gloss wet sheen. Remove the painter’s tape by pulling it back over itself at a sharp angle. Finally, wrap a soft, lint-free cloth around a flat wooden block, moisten it with the manufacturer’s clearing solvent, and sweep gently across the seam in perpendicular strokes. The solvent dissolves the excess resin on the surface while leaving the filled channel perfectly flush with the factory laminate.
Camouflaging Printed Patterns and Sheen Variations
If your countertop features a dramatic faux-stone or butcher-block print, a single continuous line of solid color—even a perfectly flush one—can still give the seam away.
To break up the optical line on patterned laminate, treat the repair like fine art restoration. Use a fine-point size zero detail brush and a darker accent tint of repair resin or acrylic artist enamel. Dab tiny flecks across the filled line to connect the dark mineral spots on either side of the joint. Interrupting the linear flow trickles the eye into reading the surface as continuous, organic movement rather than an interrupted grid.
After the pigments fully dry, address the surface sheen. Factory laminate typically carries a satin, matte, or textured stipple finish, while solvent repairs dry to a semi-gloss sheen. If the filled seam is shinier than the surrounding counter, gently buff the seam using a dry microfiber cloth and a pea-sized drop of ultra-fine automotive polishing compound to harmonize the reflective qualities across the entire kitchen work surface.
Protecting the Repaired Seam for the Long Term
Once your seam is level, filled, and blended, your goal shifts to protecting it from moisture. The joint will always remain the most structurally vulnerable point on any laminate countertop, especially if it sits near a kitchen sink or dishwasher where hot steam and puddles are common.
Never allow standing water to sit over a countertop seam. When washing dishes or preparing meals, keep a dry hand towel nearby to mop up stray splashes immediately. For added protection, treat the entire countertop with a dedicated laminate polish or hard carnauba paste wax once or twice a year. The wax settles into micro-crevices, creating a hydrophobic shield that repels moisture before it ever finds a way into the joint, keeping your countertops looking cohesive, durable, and pristine for years to come.