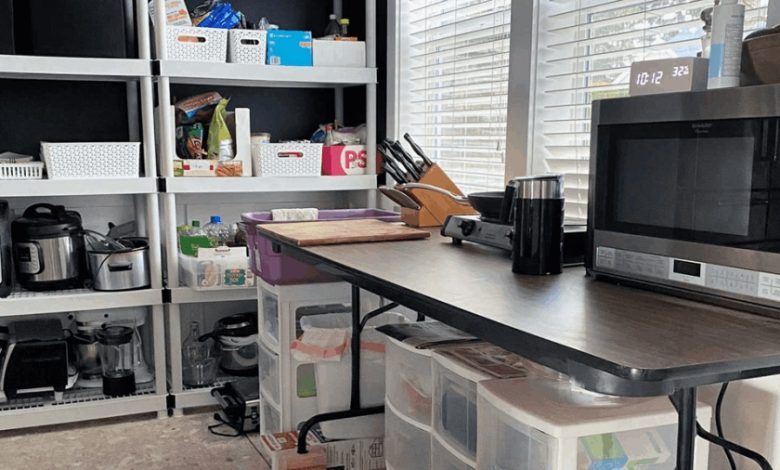
The morning after demolition is usually when the reality of a kitchen renovation sinks in. The cabinets are gone, subfloors are exposed, and the simple act of brewing a morning coffee suddenly feels like an expedition. A comprehensive kitchen overhaul rarely wraps up in two or three weeks; between structural adjustments, cabinet fabrication, and countertop templating, most homeowners live without a primary kitchen for anywhere from six weeks to several months.
Living through a renovation without losing your sanity comes down to your interim setup. Relying on restaurant takeout and delivery apps burns through renovation contingency funds quickly, and the novelty wears off after the first ten days. A well-designed temporary kitchen preserves your daily routines, keeps your nutrition on track, and prevents domestic chaos while contractors work on the other side of the plastic barrier.
Finding the Right Outpost Location
Setting up a makeshift kitchen is not merely about clearing off a spare table. The location you select dictates how smoothly your household functions throughout the project.
When scouting locations, evaluate three critical factors: proximity to running water, electrical capacity, and separation from construction dust.
A laundry room is often the prime choice. It typically features a deep utility sink that accommodates large dinner plates and stockpots, durable flooring that withstands moisture, and access to dedicated electrical lines. A finished basement equipped with a wet bar is another top-tier option, offering a secluded buffer zone far from the sounds and vibrations of daily demolition.
If you lack a utility sink or basement, a formal dining room, wide hallway, or guest bedroom can serve as your staging ground. If you must set up adjacent to the construction zone, demand that your contractor seal doorways with heavy six-mil polyethylene plastic sheeting fitted with heavy-duty zipper entries. Ensure your HVAC supply and return vents in the staging area are covered or filtered so drywall dust does not circulate into your temporary food preparation zone.
Managing Electrical Loads and Circuits
The most common mistake homeowners make when setting up a temporary kitchen is overloading household circuits. In a standard kitchen, modern building codes mandate multiple dedicated 20-amp circuits to power heat-generating appliances simultaneously. Living rooms, dining rooms, and bedrooms, by contrast, are typically wired on shared 15-amp circuits designed for low-draw lighting and electronics.
A standard 15-amp breaker can safely support roughly 1,400 to 1,800 watts of continuous load. Consider that an electric kettle draws 1,500 watts, a countertop microwave pulls 1,200 watts, and a toaster oven uses 1,400 watts. If you run your coffee maker while toasting a bagel on the same circuit, you will trip the breaker every single morning.
Take an hour before demo day to map your outlets. Plug a lamp into candidate outlets and flip breakers at the main panel to identify which receptacles share circuits. If your temporary kitchen sits in an area with limited amperage, run heavy-duty, 12-gauge extension cords from separate circuits located in adjacent rooms to balance the electrical draw across distinct breakers.
Curating the Compact Appliance Suite
You do not need to duplicate every function of your full kitchen to eat well during a renovation. The goal is versatility with a minimal footprint.
Multipurpose Cooking Equipment
Skip specialized single-use gadgets and prioritize versatile workhorses:
-
Portable induction cooktop: A single-burner induction unit heats water faster than a standard gas range, cools down almost instantly, and wipes clean with a damp towel. Because induction heats through electromagnetism rather than open coils, it dramatically reduces the risk of accidental burns in tight quarters.
-
Countertop convection toaster oven or air fryer: This appliance takes over eighty percent of your baking, roasting, and broiling tasks without radiating massive amounts of ambient heat into the room.
-
Electric multicooker or pressure cooker: A sealed electric pressure cooker prepares grains, braises proteins, and simmers soups with virtually no steam or cooking odor escaping into living areas.
-
Electric kettle: Beyond morning beverages, a rapid kettle provides boiling water for instant oats, noodles, and dish sanitization.
Cold Storage Solutions
Do not rely on a dorm-style mini-fridge for a multi-month renovation if you can avoid it. Compact units lack adequate freezer capacity, struggle to maintain safe internal temperatures when packed, and force you into daily grocery runs.
Instead, ask your demolition crew to carefully dolly your existing full-size refrigerator into the garage, basement, or dining area before tearing out the old cabinetry. Having full cold storage allows you to preserve normal grocery routines, keep gallon jugs upright, and store frozen meal-prep batches without compromise.
Establishing a Workable Dishwashing System
Food prep is manageable; doing dishes without a standard kitchen sink is where most renovation patience unravels. Attempting to wash dinner plates, pans, and spatulas in a shallow bathroom vanity sink quickly leads to splashed mirrors, food particles clogging narrow pop-up drains, and grease buildup on delicate porcelain.
If you do not have access to a deep laundry sink, adopt the two-tub busing method used in commercial catering and camping:
-
Scrape every scrap of food waste into the trash or compost using silicone squeegees or paper napkins before introducing water.
-
Fill a sturdy plastic bus tub with warm water and biodegradable grease-cutting dish soap for washing.
-
Fill a second plastic tub with clean, warm water for rinsing.
-
Set washed items onto a compact drying rack resting over an absorbent microfiber dish mat.
Dispose of the dirty graywater down a toilet rather than a bathroom sink, as toilet drain lines are significantly wider and far less prone to grease-induced clogs.
To preserve your energy, embrace a pragmatic balance between disposable and reusable tableware. Keep real flatware and ceramic coffee mugs for a touch of daily comfort, but lean on sturdy compostable paper plates and bowls for high-mess dinners to cut your wash cycles in half.
Storage, Surface Prep, and Organization
Clutter accumulates rapidly when cabinets disappear. Without structured containment, cutting boards, spice jars, and bread bags will quickly engulf every flat surface in sight.
Set up two sturdy six-foot plastic folding banquet tables to serve as your temporary counters. Plastic surfaces resist water damage, wipe clean effortlessly, and can be scrubbed without worry of finish damage.
Organize your non-perishables and cooking utensils using clear, stackable plastic storage bins with latching lids. Clear plastic allows you to locate items instantly without rummaging, and secure lids keep airborne construction dust, pet hair, and household pests away from your food. Assign dedicated totes for specific categories: one for dry breakfast staples, one for savory dry goods and spices, and one for daily utensils, cutting boards, and knives.
Pre-Demolition Preparation and Mindset
The smoothest renovations are supported by work done before the contractor swings the first hammer. Two weeks prior to demo, begin cooking double portions of freezable meals—chili, lasagna, hearty vegetable stews, and seasoned pulled meats. Freeze them flat in freezer bags or shallow glass containers so they thaw quickly and can be reheated in your countertop oven or multicooker with minimal effort.
Rethink your outdoor equipment as well. If the weather permits, treat your patio gas grill, flat-top griddle, or pellet smoker as your primary exterior kitchen. Grilling keeps high-heat searing, grease spatter, and fish or onion aromas entirely outside your living space.
Living through a major home renovation is a test of adaptability. By setting up dedicated electrical circuits, streamlining your appliances, and establishing a structured dishwashing routine, you turn what could be a chaotic disruption into a comfortable, manageable routine.